At InOrbit, we have been developing missions as a key feature for fleet management. We’ve worked closely with customers who operate robots at scale and need to understand how their fleet is performing. As the definition of a mission may differ from one customer to another, or even within robots in the same fleet, we’ve focused on building an API that can easily adapt to different setups.
In this article, we will dive into the key features that make InOrbit’s mission tracking an invaluable tool for robot development and operations: observability, performance optimization and adaptability. If you already have your robots InOrbit but haven’t used missions yet or if you are exploring the platform, you will learn how this feature can enhance your robot development.
Real time observability
Mission tracking is largely about observability. Once a mission is created and dispatched, the robot will start executing its tasks until it successfully completes them or until it needs to pause or abort its duties due to issues which may arise. Being able to see this information in real time helps the operator to take action when needed and restore the autonomy of a robot.
Visualizing mission data in real time requires adding the Missions widget to a dashboard in your InOrbit Control account.

The Missions widget shows how a mission is being executed at a glance. Its key components are:
- The mission state (such as In Progress, Completed, Abandoned). Each state can be linked to a status (OK, Error, Warning).
- The mission progress is an estimation of how much work was done and is left to be done.
- The mission label gives a name to the mission to identify it in the widget and in reports.
- The mission’s metadata is a dictionary of key value pairs with all the additional information that should be linked to a given mission (for example, packages delivered or failed for a delivery robot, area cleaned or to be cleaned for a cleaning robot, etc). This is where the concept of robot missions gets reflected. This data will feed the KPIs of each mission type.
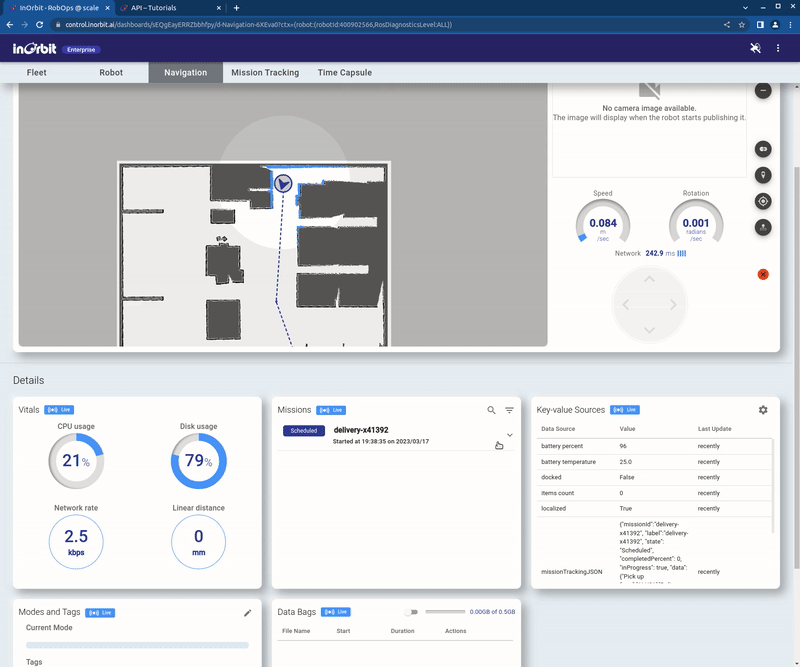
Other mission elements are the tasks that compose a mission, timestamps, and more – refer to this documentation for a full list of mission elements.
Most robots already have mission data available. Mission tracking enables you to bolster your fleet’s observability by connecting this data to InOrbit.
Performance optimization
While the Missions widget is useful to view individual missions for a robot or the entire fleet, it’s informative to explore past missions and aggregate their data to understand fleet performance over time – whether you are an executive measuring your business KPIs, a fleet operator optimizing the fleet or a roboticist analyzing how a new software fix is performing.
Adding a Missions dashboard offers a way to explore aggregated metrics and KPIs for a mission, as well as the tools to dig into individual missions (e.g. low performers). Missions can be grouped and filtered by different fields (locations, customers, mission states and more) both to understand how a mission group performs or to obtain business metrics for your customers.
Grouping and filtering missions will change the KPIs and the list of missions displayed on the dashboard. You can also expand individual missions and jump into Time Capsule for a replay and in-depth understanding of their execution.

Mission Tracking is a config away from your robots
Central to the setup of mission tracking is an understanding of what constitutes a mission to your fleet or a set of robots within it (a delivery, a cleaning task, a package pick up, a list of activities).
The Mission Tracking API expects the robot to communicate the start and end moments of a mission, as well as any relevant update such as changing its state, tasks or completed percentage. This data can be published by the robot on ROS topics for ROS-based robot stacks, or using Edge APIs or SDKs in other set-ups.

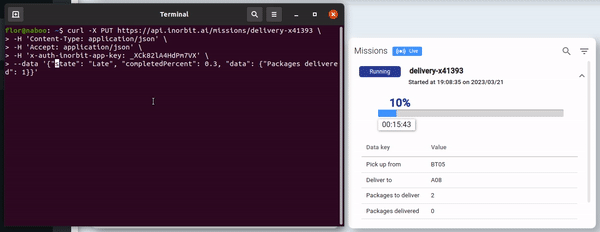
Additionally, for any robot setup, mission data can be reported via API calls using JSON objects or it can be inferred from a set of data sources published by the robot. Refer to the documentation to find out more about mission processing types.
With the mission data defined and published, connecting it to InOrbit is just a configuration away. InOrbit’s CLI makes this job easier by providing a configuration API schema for Mission Tracking and Data Sources, which can be managed through YAML or JSON files.

This tutorial will guide you through the different steps to configure mission tracking for your InOrbit account, providing examples for a quick ramp up.
What’s next?
We’ve just had a look at missions, exploring the value tracking adds to robot development and operation through:
✔ Real time observability.
✔ Analytics for performance optimization
✔ Data capture for debugging with the help of Time Capsule.
Plus, missions are simple to configure and adaptable for different robot setups.
Keep exploring missions through our documentation, and start tracking your robot’s missions on InOrbit!